
Custom Signals let you track meaningful actions on your website, such as a click on “Book a Demo”, a view of your pricing section, or a play of your product video, without writing code or involving a developer.
Once a signal is created, it is collected automatically through your DemandSense tracking tag (SensorPixel) and appears in DemandSense, so you can see which companies and visitors take the actions that point to buying intent.
The short version #
Most signals take four steps, and the Signal Builder fills in everything else for you:
- In DemandSense, go to Audiences → Signals and click + Create signal.
- On your website, find the right page in Browse mode, then switch to Tag mode and click the element you want to track.
- Check the Event type and give the signal a Name.
- Click Create event.
The other settings in the panel (Pages, Element matching, Classes, XPath) are pre-configured automatically the moment you select an element. You do not need to touch them. They are there only if you want to fine-tune how the element is recognized. If you are unsure about a setting, leave it as it is. The section “Fine-tune your signal (optional)” below explains each one.
Before You Start #
Before creating a custom signal, make sure that:
- Your website is added to your DemandSense account.
- The DemandSense tracking tag (SensorPixel) is installed on your website.
- You are logged in to DemandSense.
Important: Custom Signals can only be created for websites where the tracking tag is installed. If the tag is not detected, the + Create signal button is not available.
How to Create a Custom Signal #
Step 1. Open the Signal Library
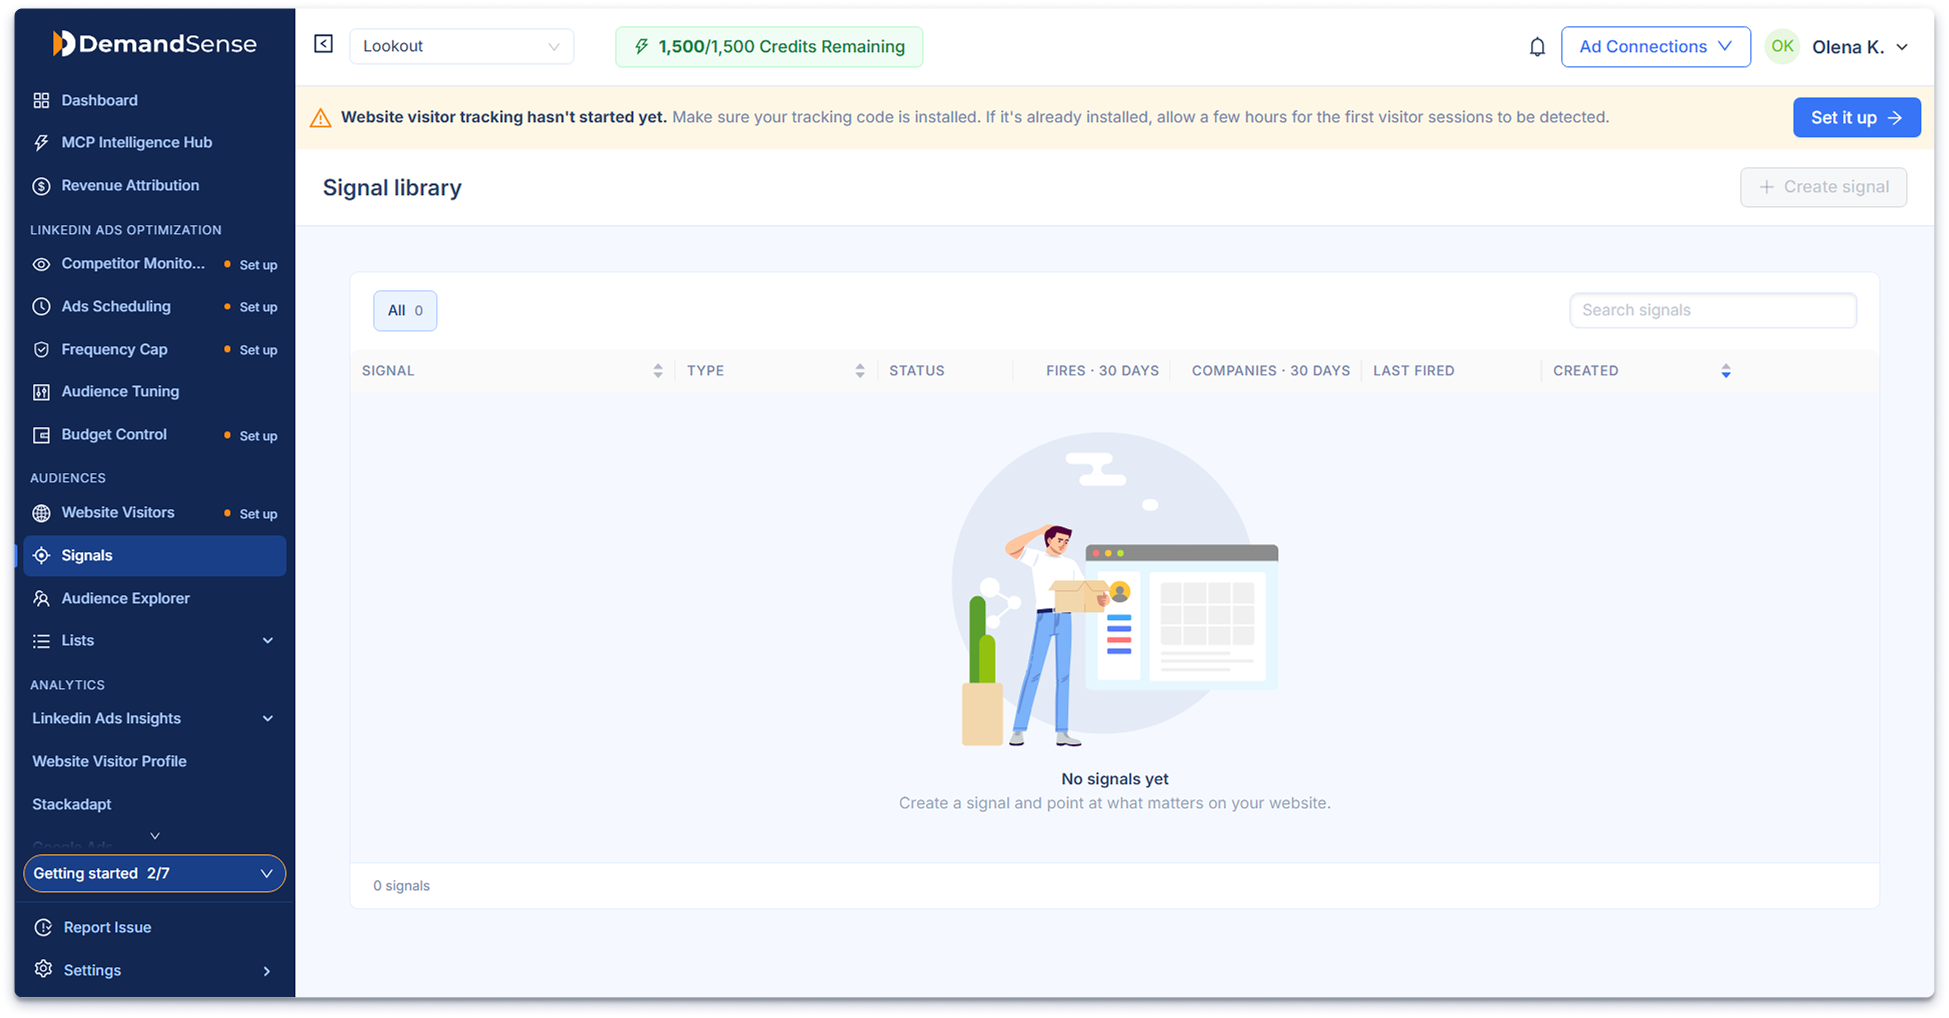
In DemandSense, go to Audiences → Signals. The Signal library lists all your signals. If you have none yet, you will see an empty table and a + Create signal button in the top-right corner.
Step 2. Launch the Signal Builder
Click + Create signal. Your website opens in a new browser tab with the Signal Builder on the side.
Keep your original DemandSense tab open while you work. The builder needs this connection to save your signal.
The builder has two modes, which you switch between at the top of the panel:
- Browse: use your website as normal, for example, to open the page that contains the element you want to track. Clicking in this mode never selects anything.
- Tag: clicking an element selects it for tracking instead of triggering its usual action.
Step 3. Find the element and select it
- Stay in Browse mode and navigate to the page where the element lives.
- Switch to Tag mode.
- Click the element, for example, a button, link, or section → + Create event.
As soon as you click, the panel shows a new event form that is already filled in based on your selection. Nothing is saved yet.
Step 4. Check the event type and name your signal
At the top of the form:
- Name: enter a clear name you will recognize later in the Signal library and in your reports. The panel suggests the element’s own text, which is fine to keep if it is descriptive.
- Event type: choose what should be tracked, such as Click or View. For a button or link, Click is usually what you want. Use View to record when a section or element becomes visible. See “Available Custom Signal Types” below.
Step 5. Click Create event
At the bottom of the panel, click Create event. The signal appears in the Signal library. Click Cancel instead if you want to leave without saving.
That is all most people need. If you want to understand or adjust the remaining settings, read on.
Fine-tune your signal (optional) #
The settings below tell DemandSense where a signal should count and how to recognize your element. They are generated for you, and the defaults work in most cases. Change them only if you have a reason to, for example the signal should count on one page only, or it fires in the wrong places.
Pages: where should the signal count?
By default both options are off, which means the signal counts on every page where the element appears. This suits a button that appears across your whole site, such as a header “Book a Demo” button.
| Option | What it does | When to use it |
|---|---|---|
| Only on URL | Counts the signal only on pages whose URL matches the one you enter. The grey example text shows the format, and the * at the end works as a wildcard, so https://yoursite.com/* covers every page on the site. | The same button exists on several pages, but you only care about one of them. |
| Only on page title | Counts the signal only on pages with a matching page title. | The URL changes but the page title stays consistent. |
Element matching: how is the element recognized?
This section controls how DemandSense finds your element again on later visits. It is the part that looks most technical, but it is optional.
Position. How strictly the element’s place in the page must match what you selected:
- Exact: the element must be in the same place in the page structure as when you selected it. The strictest option.
- Close: the element can be slightly off from where it was selected.
- Nearby: allows a wider difference in position.
- Anywhere: recognizes the element wherever it appears on the page.
If the signal does not fire after a small page change, try a looser option. If it fires on the wrong element, try a stricter one.
Match by. The properties of the element that DemandSense uses to identify it. Ticked properties are used, unticked ones are ignored:
| Property | What it is |
|---|---|
| id, name | Identifiers set in the page’s code. |
| type, value | The kind of element, and the value it carries. |
| href | The link address of a link. |
| alt | The alternative text of an image. |
| src | The source address of an image or video. |
| text | The visible text of the element. |
| children | The elements inside the selected element. |
| ancestor | The elements around the selected element. |
| index | The element’s position among similar elements. |
A property appears greyed out when it is not available for your element or is already built in. The builder ticks the most reliable ones for you.
Two practical rules:
- Properties that are unlikely to change (an ID, or button text you control) make a signal durable.
- Properties that change often (a link address with tracking parameters, or a position number) can make a signal stop firing after a site update. If you tick fewer boxes, the signal is more flexible. If you tick more, it is more precise.
Classes. An optional extra match on the element’s design classes. Leave it off unless you need to tell apart two otherwise identical elements. Design classes tend to change in redesigns.
Element tag. The type of HTML name assigned to a specific element on a webpage. It tells the browser what type of content or component that element represents. For example, when you inspect a webpage, you might see tags such as a, div, h3, form, etc.
XPath: the final result
The XPath is the address that DemandSense generates from your choices above, and it is what finally identifies the element on your site. You can read it, and edit it if you know XPath, but you never have to.
The green badge shows how many elements on the current page the XPath finds:
- 1 match: the signal points to exactly one element. This is what you want.
- More than 1 match: the signal would count other elements as well. Tick an extra property under Match by, or tighten the Position.
- No match: the element is not found. Reselect the element or loosen the settings.
Available Custom Signal Types #
DemandSense supports several types of custom signals that allow you to track specific website interactions and visitor activity. Each type captures a different kind of behavior, helping you understand how visitors engage with your website and which actions indicate interest in your products or services.
Page Visit signals track when a visitor lands on or visits a specific page of your website. For example, you can track visits to your Pricing, Product, or Case Studies pages. Use these signals to understand which pages attract visitors’ attention and identify the content they are most interested in.
Click signals track when a visitor clicks a specific element on your website, such as a Book a Demo button, a Get Started CTA, or a link to a product page. These signals help you measure engagement with calls to action and understand which website elements encourage visitors to take action.
View signals track when a specific website element or section becomes visible to a visitor. For example, you can track when visitors view your product information, customer testimonials, or pricing sections. Unlike Page Visit signals, which track visits to a whole page, View signals track a specific element or section. This helps you understand which parts of your website receive visitors’ attention.
Input signals track when a visitor interacts with a specific form field, such as an email or contact form field. They help you understand whether visitors engage with your forms without collecting the actual values they enter.
Trait signals track when a visitor fills in a specific profile field, such as company name or job title, without collecting the entered values. These signals help you understand engagement with profile-related fields while keeping the actual input values private.
Watch Video signals track when a visitor plays a video embedded on your website, such as a YouTube product demo. Use these signals to measure engagement with video content and understand whether visitors interact with your videos.
Important: Do not configure signals on password fields or fields containing personal or sensitive information. Such fields should not be tracked.
Managing Your Custom Signals #
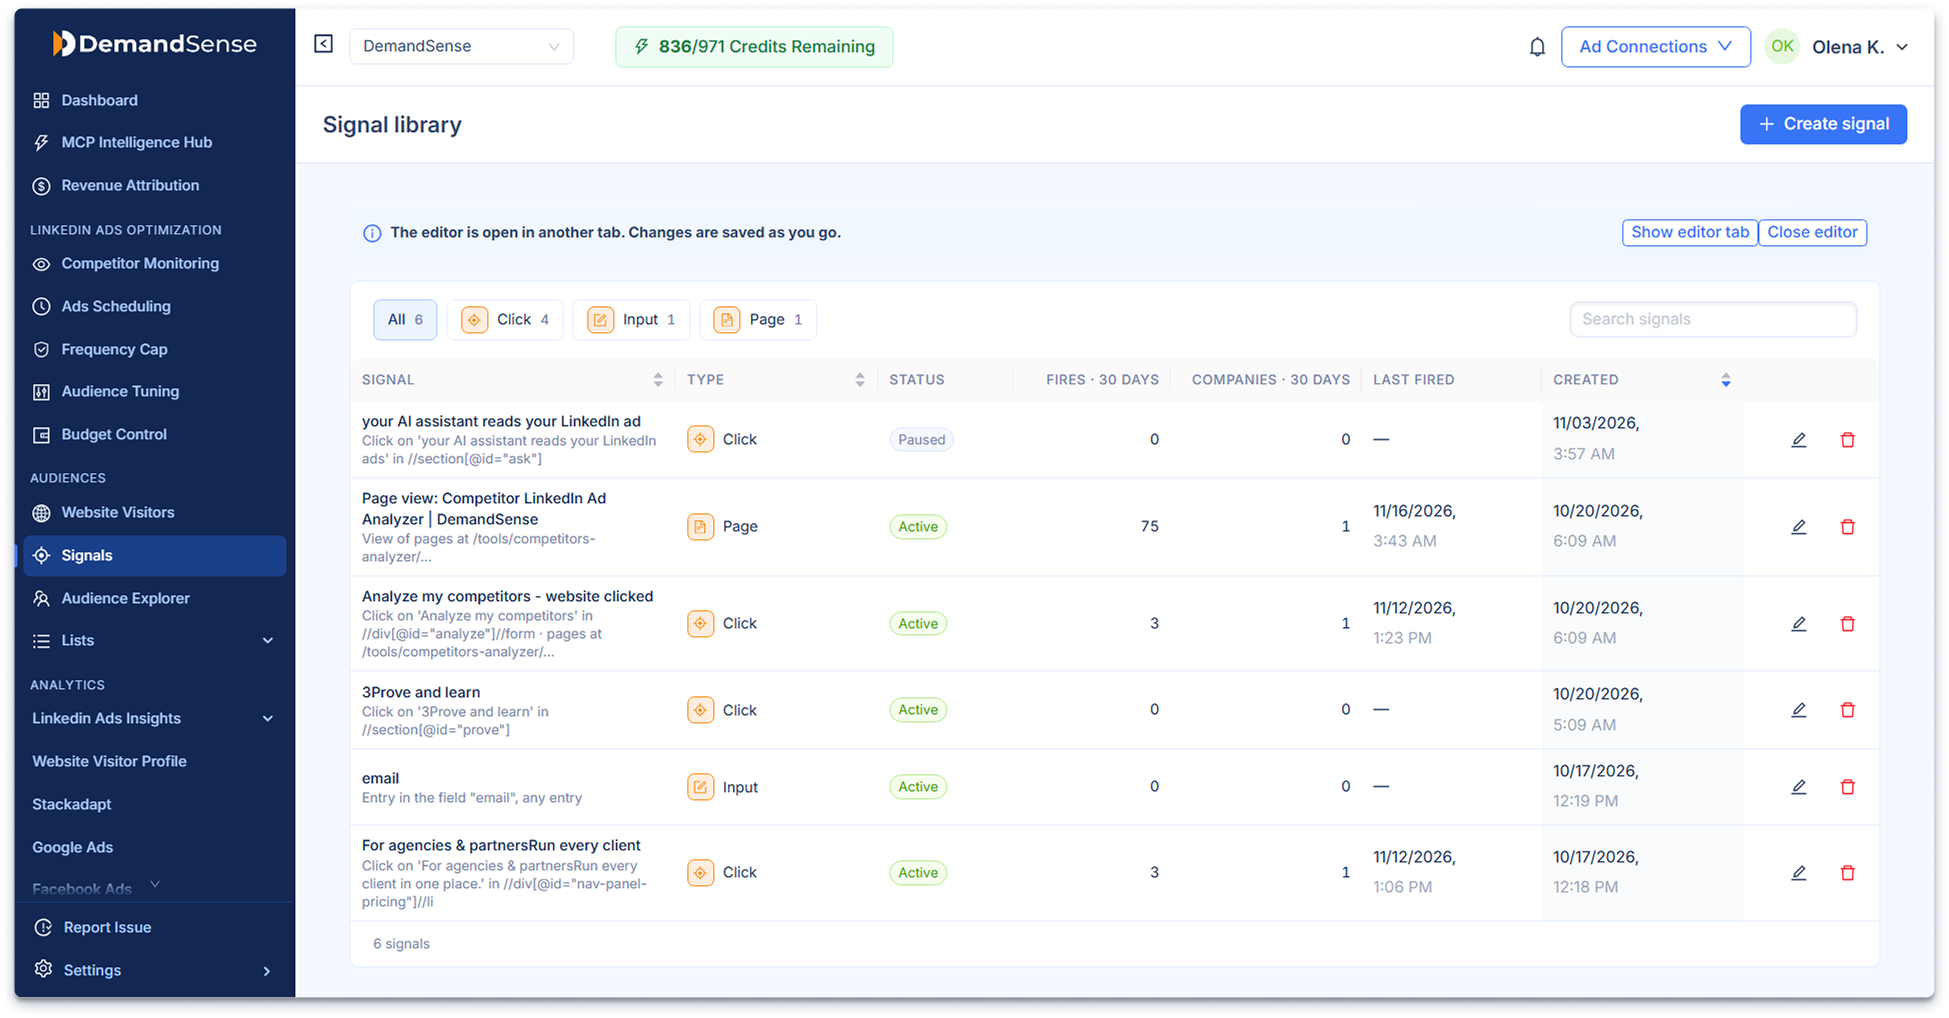
After creating signals, you can manage them directly from the Signal library under Audiences → Signals. The library provides an overview of your existing signals and their tracking activity.
Each signal appears as a separate row with the following information:
| Column | Description |
|---|---|
| Signal | The signal name and a short description of the interaction or page being tracked. |
| Type | The type of interaction being tracked, such as Click or Page Visit. |
| Status | Indicates whether the signal is currently active or paused. |
| Fires · 30 Days | The number of times the signal was triggered during the last 30 days. |
| Companies · 30 Days | The number of companies associated with the signal during the last 30 days. |
| Last Fired | The date and time when the signal was last triggered. |
| Created | The date and time when the signal was created. |
Finding, Editing, and Deleting Signals #
Find a signal. Use the controls at the top of the Signal library:
- All: Display all created signals.
- Signal type filters: Filter signals by type, such as Click or Page Visit.
- Search signals: Search for a signal by its name.
Edit a signal. Click the Edit (pencil) icon in the signal’s row, or open the signal and click Edit on its detail page. Make your changes and save them.
Delete a signal. Click the Delete (trash) icon in the signal’s row, or open the signal and click Delete on its detail page. Confirm the deletion if prompted. Once deleted, the signal will no longer be available as an active tracking rule.
Viewing Signal Details #
Click any signal in the Signal library to see its details. Use this view to check whether a signal is working and to see who is triggering it. To return to the library, click ← All signals at the top of the page.
Signal header: The top of the page shows the signal name, its status (for example, Active), its type, a short description, and the date it was created. The Pause, Edit, and Delete buttons are in the top-right corner.
How often it fired: This section shows how many times the signal fired and how many distinct companies those fires came from. Counts are shown for the last 7 days, last 30 days, last 90 days, and all time. The dates of the first and last fire appear above the cards.
The number of fires can be higher than the number of companies. A single company can trigger a signal many times, and fires from visitors who can’t be matched to a company are counted as fires but not as companies.
Recent fires: This table lists individual fires, newest first, and shows who was behind each one: a company or an anonymous visitor. Use the All, Companies, and Anonymous visitors tabs to filter the list. For each fire, you can see:
| Column | Description |
|---|---|
| Date and time | When the signal fired. Click the column header to change the sort order. |
| Region | The visitor’s location. |
| Traffic type | How the visitor arrived, such as Search or Direct. |
| Page | The URL and title of the page where the signal fired. |
| Referrer | The site the visitor came from. Shows N/A if there is no referrer. |
| Time on page | How long the visitor spent on the page. Shows N/A if it isn’t available. |
The table is paginated, and you can change the number of rows shown per page.
Why it’s useful
- Confirm that a new signal is firing as expected.
- Identify which companies are engaging with a page or element.
- See which traffic types and referrers bring engaged visitors.
- Spot sudden spikes or drops in activity after a website update.
Important Things to Know #
- No retroactive tracking: Custom Signals start collecting matching interactions after they are created. They do not automatically populate historical activity from before their creation.
- Tracking tag required: Your DemandSense tracking tag must remain installed on your website for signals to work.
- Keep your DemandSense tab open: When creating a signal, do not close the original DemandSense tab while working in the Signal Builder.
- Website changes: If you redesign your website or significantly change an element, a signal configured for that element may no longer match it. Review your signals after major website updates.
- Privacy: Input and Trait signals are designed to capture interaction matches, not the actual values entered by visitors. Avoid selecting fields containing personal or sensitive information.
Troubleshooting: Signal Builder Not Opening or Selecting Elements #
In some cases, your website settings or browser configuration may prevent the Signal Builder from opening or selecting elements correctly. If you experience any issues, check the following:
The Signal Builder fails to load.
Some websites restrict external scripts for security reasons. If you see the error “Couldn’t load the DemandSense editor,” your website’s security settings may be blocking the Signal Builder. Ask your developer to allow scripts from https://app.demandsense.com.
The editor cannot connect to your DemandSense account.
If you see the message “Open the editor from your DemandSense account to edit this page,” your website’s security settings may be preventing the connection between the Signal Builder and your DemandSense account. Ask your developer to review the website’s Cross-Origin-Opener-Policy (COOP) settings.
The Signal Builder does not open in a new tab.
Your browser may be blocking pop-ups. Allow pop-ups for app.demandsense.com and try opening the Signal Builder again.
The website was opened directly.
Always open the Signal Builder using the + Create signal or Edit button in DemandSense. Opening your website directly in a browser tab will not establish the connection required to use the builder.
Some website elements cannot be selected.
Elements embedded from third-party services, such as forms or chat widgets, may not be accessible to the Signal Builder. The same limitation can apply to elements inside Shadow DOM components. If you cannot select an element, check whether it belongs to an embedded third-party component. You may need to track a different element on the page instead.
Final Notes #
Once your Custom Signals are created, DemandSense can start tracking the configured website interactions and make this activity available for analysis.
You can use these signals to better understand how visitors, both identified companies and anonymous visitors, engage with your website, which pages and elements attract their attention, and which actions indicate stronger interest in your products or services.
You can return to the Signal library at any time to review existing signals, open their details, edit their configurations, or create new ones as your tracking needs evolve. Consider focusing on the interactions that provide the most meaningful insights into visitor engagement and buying intent.